
Cookie Infatuation
This article was originally published in the fabulous Arts Paper on Dec 1, 2017.

Every year, I fall victim to the December cookie infatuation that sweeps through our country. It doesn't matter at all that Christmas is not my personal holiday, any month-long celebration of a food group (yes I consider cookies to be a food group) just can't be ignored. Food for me is an expression of love, and the precious beauty and diversity of cookies not to mention the sheer number that it is possible to bake, make them the perfect vehicle for spreading the love far and wide.
More than ever these days, I witness people wanting to find ways to connect with others to cope with the stress and rising expressions of hatred in our communities. Cookies of course can not heal the ills of the world, but as I have learned over decades of cooking and activism, acts of kindness and meaningful relationship building are an important part of the process of undoing the segregation and ignorance that often divides us and fuels the hatred. Bringing people together through cooking and eating has the potential to breakdown barriers and build some of those connections. Programs like Sanctuary Kitchen at CitySeed in New Haven, neighborhood soup nights, community gardens and community cooking classes are all great places where these connections can happen. In the cold of winter, cookies are a wonderful excuse to turn on the oven, get baking and then share some of the love with neighbors and people you are wanting to connect with. Think outside the box cookie swaps with a collection of churches, temples and mosques, at a refugee resettlement organization, or organize a baking class at a local community center, bring in needed ingredients and support the talented bakers in that neighborhood share their favorite recipes.

My love of cookies hit young, as I suppose it does with most of us. I learned to bake at a very early age, when my mother used to mix up fancy desserts in our apartment kitchen and deliver them to Annie's Firehouse, a little restaurant that used to be on Edwards St & State St in New Haven,CT. I watched her decorate cakes, learned to whip up meringues, and balanced desserts on my lap in the back seat while she delivered them to the restaurant. My two favorite cookbooks at this time (the late 70's early 80's) were an old spiral bound Betty Crocker cookie book and a black and white french pastry book. My sister and I would flip through the pages, circling our favorites, or placing colored pencil checkmarks next to ones we were dying for our mother to let us mix up at home. The sweet tooth I had genetically inherited was exacerbated and allowed to flourish, and dreams of cookies were the initial fuel.

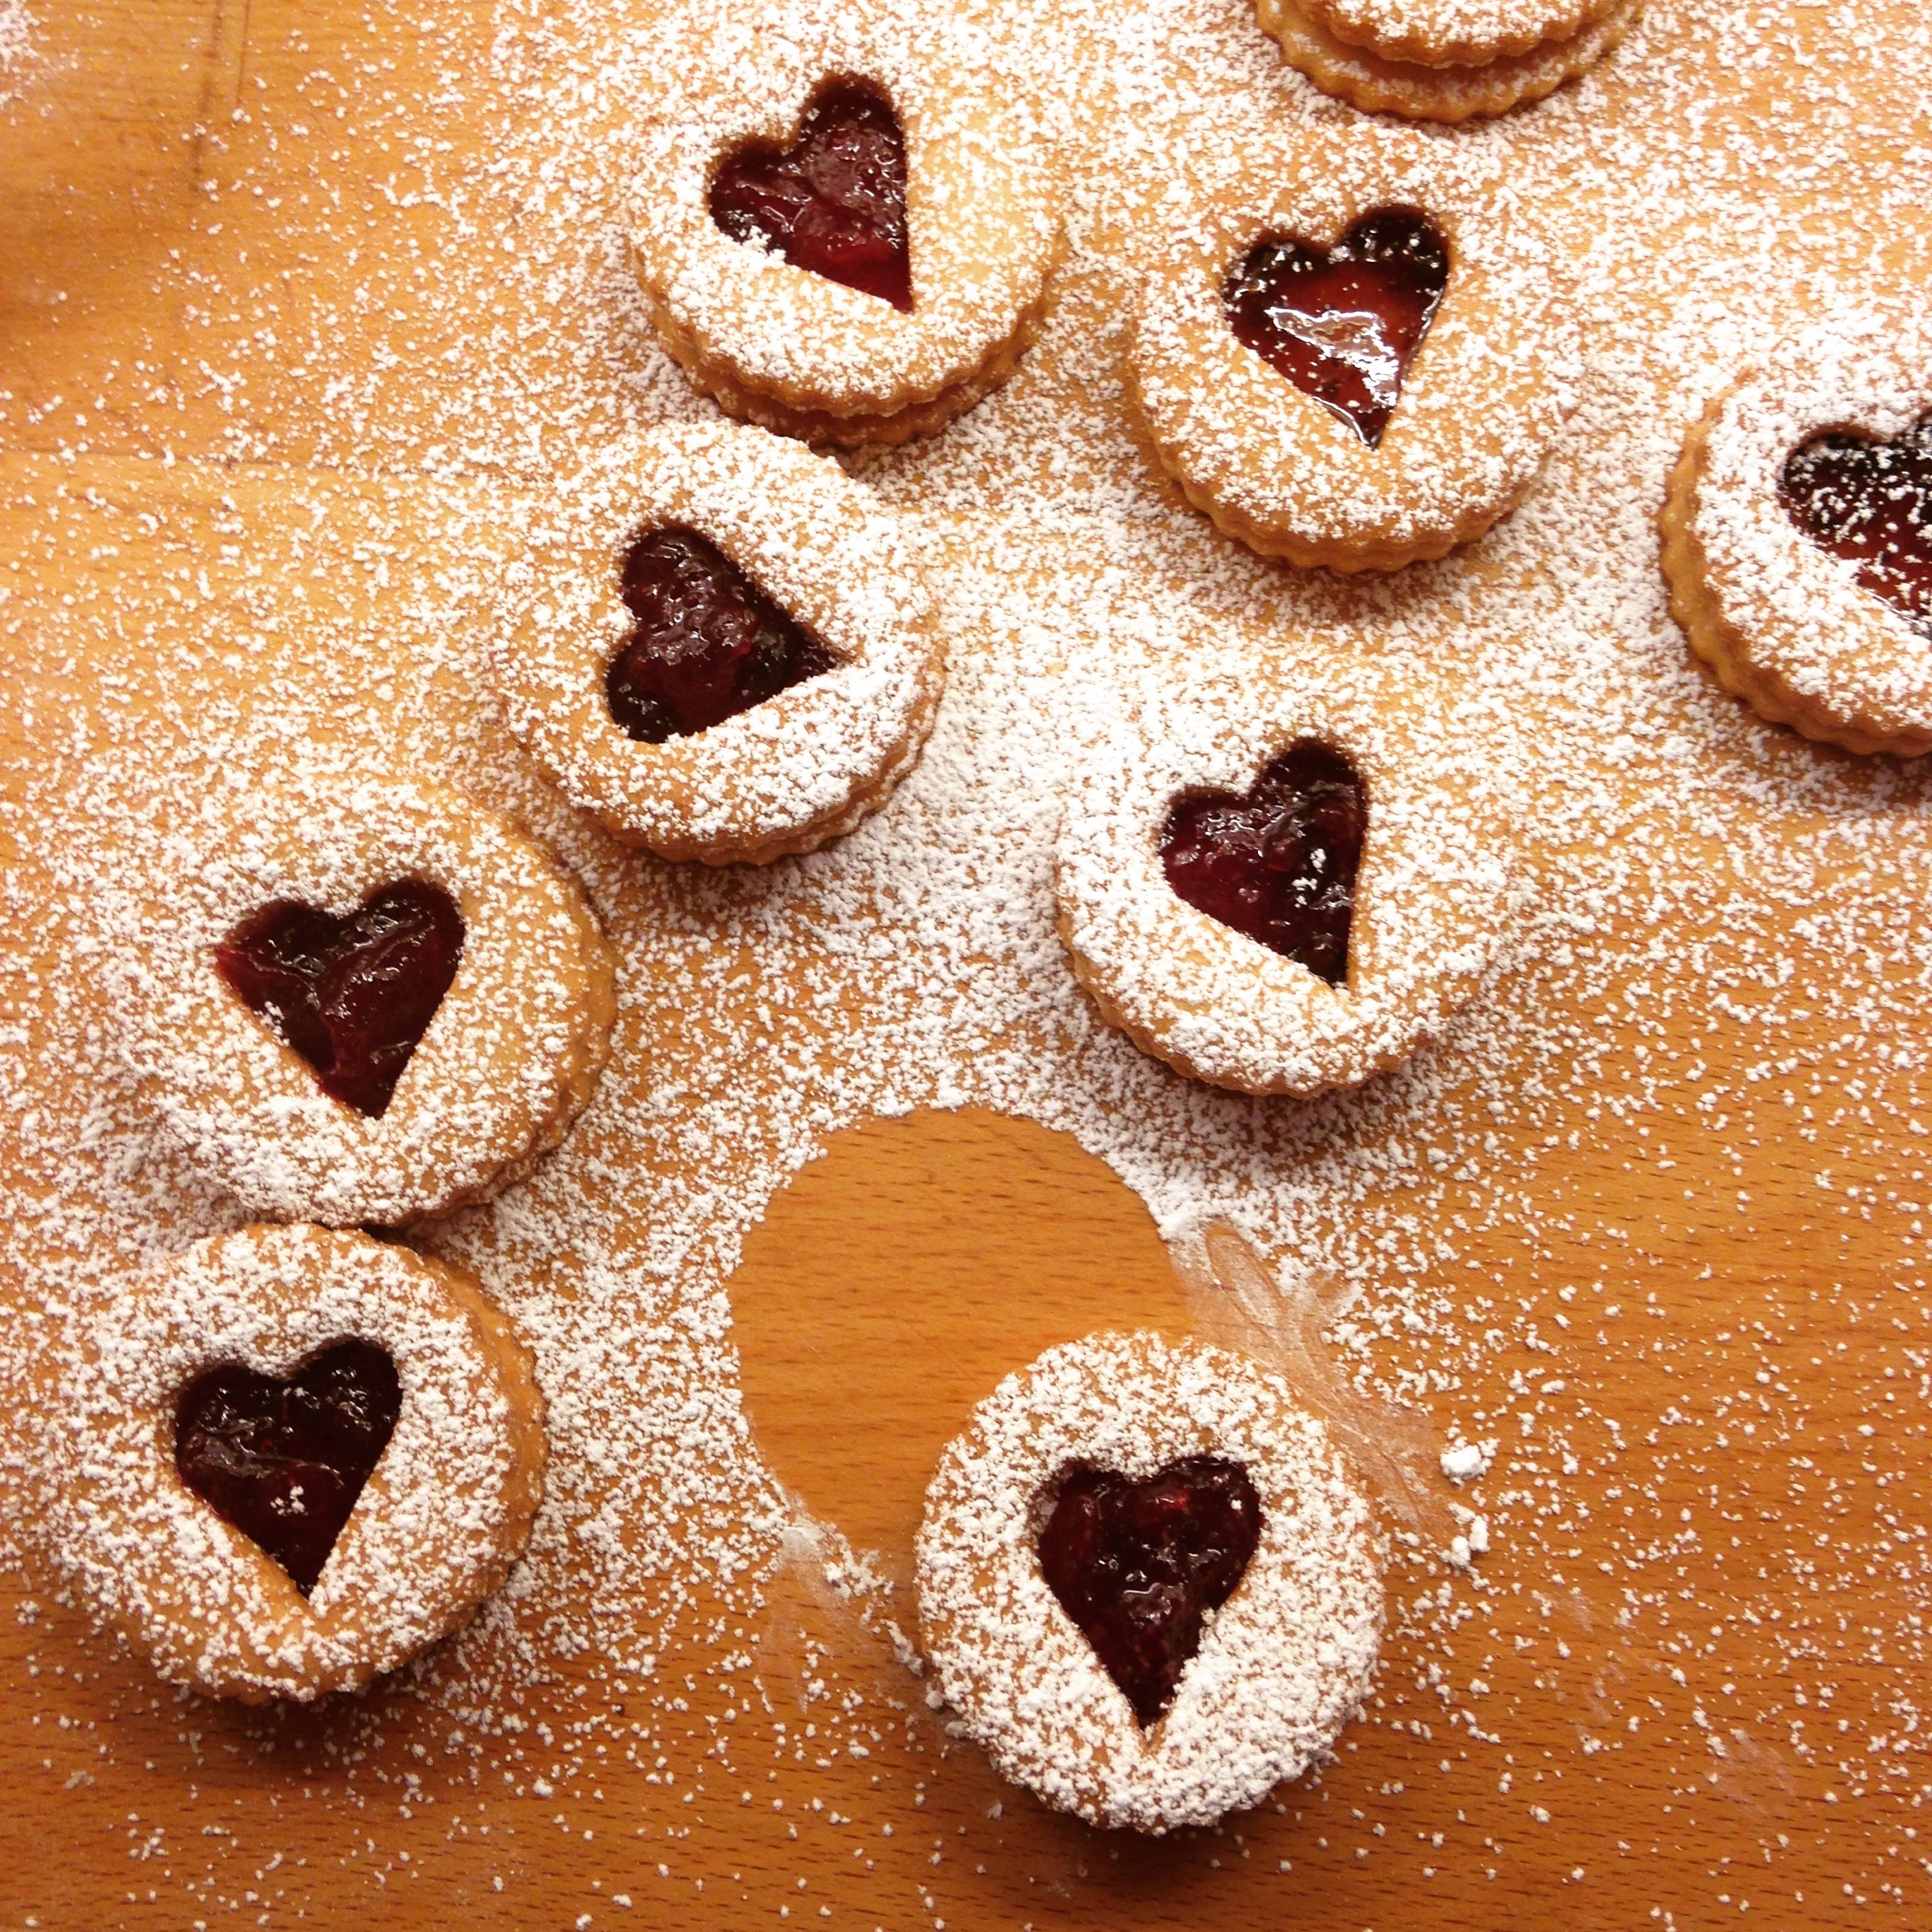
From top left: Soft Glazed Gingerbread, Rugelach, Chocolate Brownie Cookies, Brown Butter Rosemary Pecan Melt-Aways, Chocolate Clusters with Cherry, Ginger and Pumpkin Seeds, Linzer Hearts.
After years of baking, then becoming an advocate for healthy eating and food justice, as well becoming a mother of two, my sweet tooth has balanced out a bit, but my seasonal love of cookies has lived on happily undeterred. There are a number of favorites I make every year, such as the European Jewish Rugelach I learned to bake in one of my first professional jobs during the mid 90's in Brooklyn at Margaret Palca Bakes. Her version mixes powdered sugar into the cream cheese dough, resulting in a perfect chewy not-too-sweet cookie. The Soft Ginger Bread Cookies, a recipe from Tartine Bakery in San Francisco are exceptional with just the right mount of chewiness and spice and each year I search around my kitchen for a tool with a fun texture to stamp into the top, (since a patterned rolling pin has not entered my tool drawer). The Shaved Coconut Macaroons from Alice Medrich are a favorite at our passover table, but are fabulous for the holiday season since they are simple to make, gluten free, and by far the best macaroon I have ever had. They are great topped with a square of dark chocolate or mixed with a generous amount of lime zest, whichever best balances out your cookie assortment or suits your tastes. Some other favorites are of my own personal invention: the Brown Butter Rosemary Pecan Melt-Away Cookies, and the completely grain and dairy free Chocolate Clusters with Tart Cherries, Ginger and Pumpkin Seeds, are both delicious and easy to make. Baking these cookies will not change the world, but I do hope they bring you, and those around you some needed sweetness, connection, and joy this year.
Scroll down to see all the recipes or click here for a Full printable PDF of these cookie recipes.
For a special sweet with very low sugar content check out these Cocoa Truffles with a secret ingredient.
My Favorite Cookie Recipes

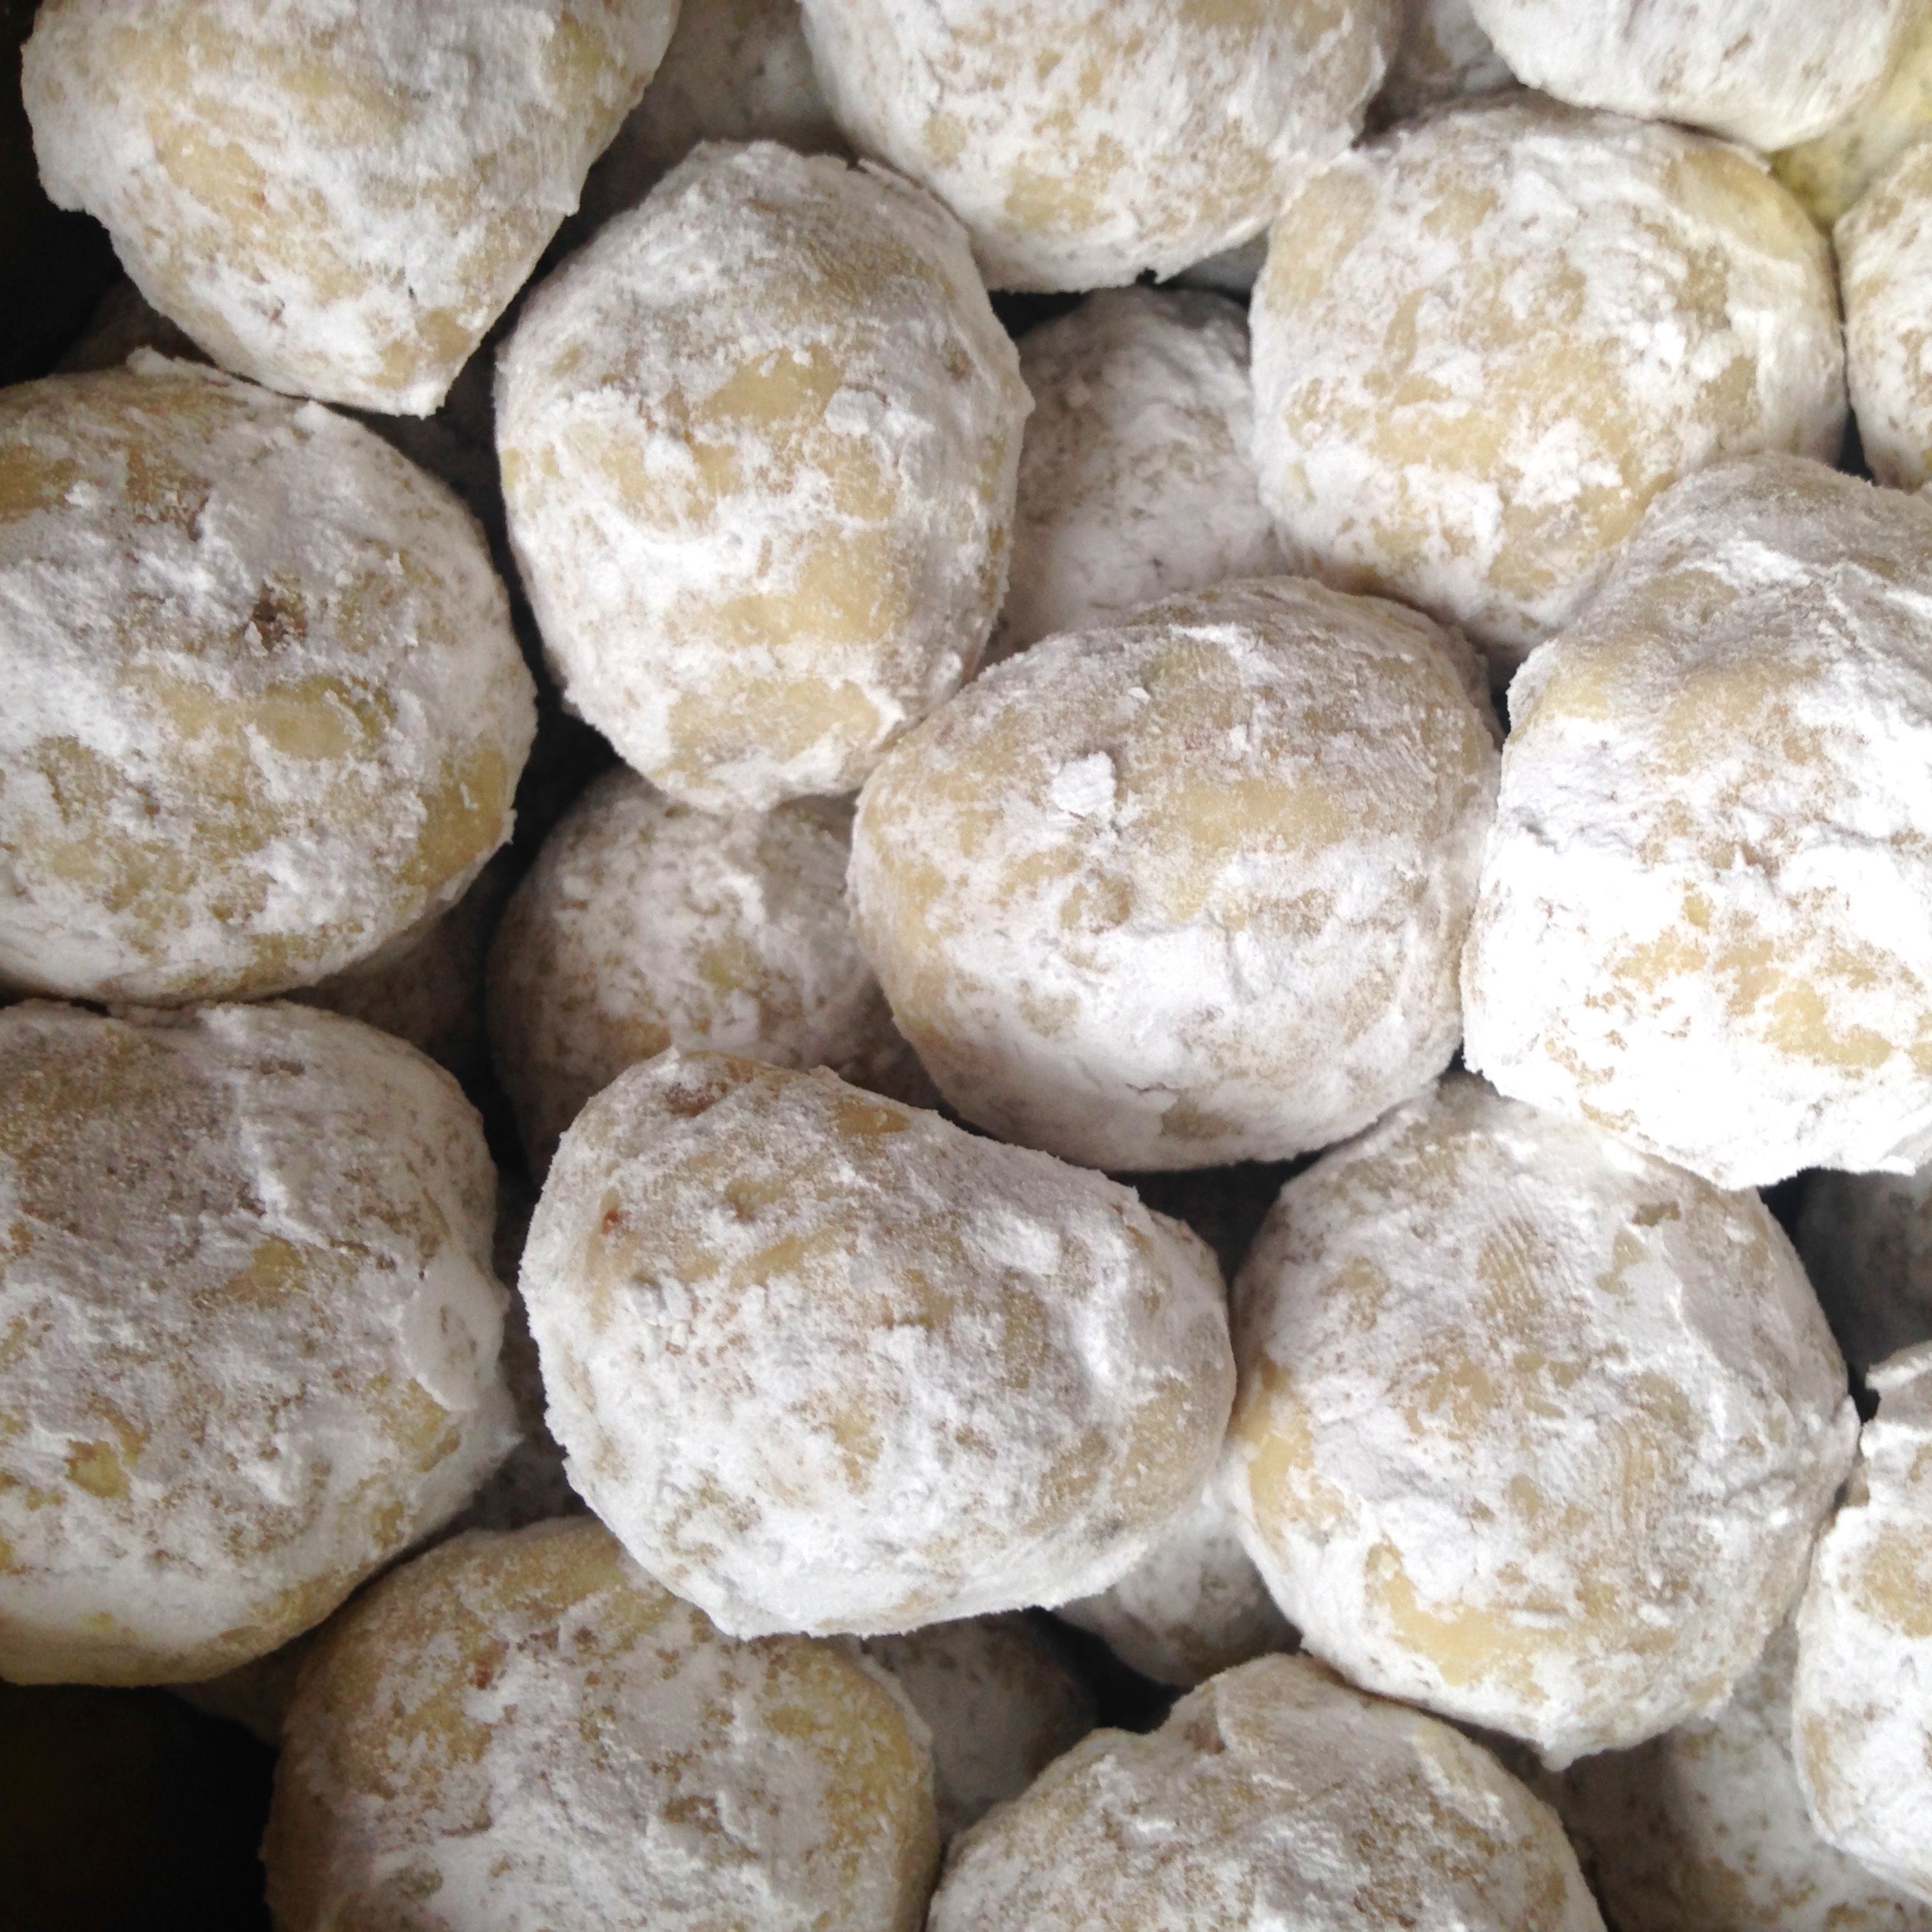
Brown Butter Rosemary Pecan Melt-away cookies
Adapted From the Brown Butter Melt-aways in “The Secrets of Baking” by Sherry Yard
2 sticks unsalted butter
1½ cups plus 2 tablespoons confectioners’ sugar, plus up to 1 cup for dusting, as needed
¼ teaspoon salt
1½ cups all-purpose flour, sifted
½ teaspoon finely chopped fresh rosemary
½ cup finely chopped pecans
A few hours before you wish to bake the cookies, make the brown butter. Melt the butter in a medium saucepan over medium heat. Cook until the solids separate and brown to a dark golden color, 7 to 10 minutes.
Remove from the heat and let cool at room temperature, and then chill it in the refrigerator until it is solid.Using a standing mixer fitted with a paddle attachment, cream the brown butter on medium speed until cream-colored, about 2 minutes. Scrape down the sides of the bowl and the paddle. Add the 1 1/2 cups plus 2 tablespoons confectioners’ sugar and the salt. Cream on medium speed until it is smooth and lump free, about 1 minute. Stop the mixer and scrape down the sides of the bowl and the paddle.
On low speed, add the flour and chopped nuts. Beat until just incorporated. Do not over beat. Scrape down the sides of the bowl and the paddle. Remove the dough from the mixer, wrap it in plastic film and chill for at least 30 minutes.
Preheat the oven to 350˚F. Adjust the rack to the lower third of the oven. Line two baking sheets with parchment paper. Flour your hands. Pinch off pieces of dough and roll them into 1-inch balls. Place the balls 1 inch apart on the prepared baking sheets. Bake one sheet at a time for 12 to 15 minutes, or until light golden brown around the edges, turning the sheet front to back halfway through the baking. Do not overbake, or your cookies will be too dry and crisp.
As soon as you remove the cookies from the oven, cover them completely with confectioners’ sugar. The best way to do this is to place the powdered sugar in a strainer and tap it over the cookies on the baking sheet. Let the cookies cool completely before removing them from the baking sheets and serving.

Linzer Hearts
Adapted from Baking: From My Home to Yours by Dorie Greenspan
1 1/2 cups finely ground almonds, hazelnuts or walnuts
1 1/2 cups all-purpose flour
1 1/2 teaspoons ground cinnamon
1/4 teaspoon salt
Scant 1/4 teaspoon ground cloves
1 large egg
2 teaspoons water
1 stick (8 tablespoons) unsalted butter, at room temperature
1/2 cup sugar
1/2 cup chocolate chips
Whisk together the ground nuts, flour, cinnamon, salt and cloves. Using a fork, stir the egg and water together in a small bowl.
Working with a stand mixer, preferably fitted with a paddle attachment, or with a hand mixer in a large bowl, beat the butter and sugar together at medium speed until smooth, about 3 minutes, scraping down the bowl as needed. Add the egg mixture and beat for 1 minute more. Reduce the mixer speed to low and add the dry ingredients, mixing only until they disappear into the dough. Don't work the dough much once the flour is incorporated. If the dough comes together but some dry crumbs remain in the bottom of the bowl, stop the mixer and finish blending the ingredients with a rubber spatula or your hands.
Divide the dough in half. Working with one half at a time, put the dough between two large sheets of wax paper or plastic wrap. Using your hands, flatten the dough into a disk, then grab a rolling pin and roll the dough, turning it over frequently and lifting the paper so it doesn't cut into it, until it is about 1/4 inch thick. Leave the dough in the paper, and repeat with the second piece of dough. Transfer the wrapped dough to a baking sheet or cutting board (to keep it flat) and refrigerate or freeze it until it is very firm, about 2 hours in the refrigerator and about 45 minutes in the freezer.
Center a rack in the oven and preheat the oven to 375°F. Line two baking sheets with parchment or silicone baking mats. Peel off the top sheet of wax paper from one piece of dough and, using a small heart-shaped cookie cutter, cut out as many cookies as you can. If you want to have a peek-a- boo cutout, use the end of a piping tip to cut a very small circle from the centers of half the cookies. Transfer the hearts to the baking sheets, leaving a little space between the cookies. Set the scraps aside—you'll combine them with the scraps from the second disk and roll, cut and bake more cookies.
Bake the cookies one sheet at a time for 11 to 13 minutes, or until the cookies are lightly golden, dry and just firm to the touch. Transfer the cookies to a rack to cool to room temperature.
Repeat with the second disk of dough. Gather the scraps together, press them into a disk, roll them between sheets of wax paper or plastic wrap and refrigerate until firm, then cut and bake.
To dip the cookies, have a baking sheet lined with wax paper at the ready. When the cookies are cool, melt the chocolate chips in a coffee cup or small bowl. Dip one edge of each cookie into the chocolate, letting the excess chocolate drip back into the cup and running the edge of the cookie against the edge of the cup to clean the dipped side, then place the cookie on the lined baking sheet. When all the cookies are dipped, slide the baking sheet into the refrigerator or freezer to set the chocolate.
Storing: The cookies will keep in a covered tin—use wax paper to separate the layers—for about 3 days. They can be frozen for up to 2 months.

Coconut Macaroons
From Alice Medrich - These are so easy and by far the best coconut macaroon I've ever had!
Makes about 22 cookies
4 large egg whites
3 1/2 cups unsweetened dried flaked, not shredded, coconut (also known as coconut chips)
3/4 cup sugar
2 teaspoons pure vanilla extract (available kosher for Passover, or can be omitted)
Slightly rounded 1/4 teaspoon salt
1. Line 2 cookie sheets with parchment paper.
2. Combine all of the ingredients in a large heatproof mixing bowl, preferably stainless steel
because the mixture will heat faster than in glass. Set the bowl directly in a wide skillet of
barely simmering water (if your bowl bobs in the water, simply pour some out). Stir the
mixture with a silicone spatula, scraping the bottom to prevent burning, until the mixture
is very hot to the touch and the egg whites have thickened slightly and turned from
translucent to opaque, 5 to 7 minutes. Set the batter aside for 30 minutes to let the
coconut absorb more of the goop.
3. Preheat the oven to 350 degrees. Position racks in the upper and lower thirds of the oven.
4. Using 2 tablespoons of batter, make attractive heaps 2 inches apart on the lined cookie
sheets. (You can also make these smaller and bake for less time, in 1-tablespoon heaps.)
Bake for about 5 minutes, just until the coconut tips begin to color, rotating the pans from
top to bottom and from front to back halfway through the baking time to ensure even
baking.
5. Lower the temperature to 325 degrees and bake for 10 to 15 minutes, until the cookies
are a beautiful cream and gold with deeper brown edges, again rotating the pans from
top to bottom and from front to back halfway through the baking time. If the coconut tips
are browning too fast, lower the heat to 300 degrees. Set the pans or just the liners on
racks to cool. Let cool completely before gently peeling the parchment away from each
cookie.
6. The cookies are best on the day they are baked — the exterior is crisp and chewy and the
interior soft and moist. Although the crispy edges will soften, the cookies remain delicious
stored in an airtight container for 4 to 5 days.
7. Upgrade 2.1: Chocolate-Topped Coconut Macaroons. Do this for any version of Coconut
Macaroons: While the cookies are still hot, top each with a little piece of your favorite
milk or dark chocolate. Or drizzle a little melted chocolate over each cookie.
8. Upgrade 2.2: Coconut Macaroons with Lime Zest and Cinnamon. Stir 1 1/2 to 2 teaspoons
freshly grated lime zest into the batter before scooping it. Using a fine grater or
Microplane zester, grate a little cinnamon stick over the cookies just before serving.
SHORTBREAD (w/ meyer lemon)
Base recipe:
1 cup (2 sticks) unsalted butter, room temperature
1 cup confectioners sugar
1 teaspoon vanilla extract
1/2 teaspoon salt
2 cups all-purpose flour (spooned and leveled), plus more for rolling
FLAVOR VARIATIONS (OPTIONAL MIX-INS AND COATINGS)
Mix in grated zest of 2 oranges and 1/2 cup dried cranberries
Mix in grated zest of 2 limes; coat with 1/4 cup cornmeal
Mix in 1/2 cup chopped dried apricots; coat with 1/2 cup finely chopped pistachios
Mix in candied meyer lemon zest from 4 lemons (recipe below)
Mix in 1/4 cup finely chopped candied ginger; coat with 1/4 cup sesame seeds
Mix in 2 teaspoons dried lavender flowers
1. With an electric mixer, beat butter, sugar, vanilla, and salt until smooth. With mixer on
low speed, add flour, mixing just until a dough forms. Stir in desired mix-ins.
2. Divide dough in half; place each half on a piece of floured waxed or parchment paper.
With floured hands, gently roll each into a 1 1/2-inch- diameter log. Dividing evenly,
sprinkle logs with desired coating if using, rolling log (to help coating adhere) and
pressing in gently. Wrap logs tightly in thepaper, and refrigerate until firm, 1 to 1 1/2
hours. (To store longer, wrap log and paper tightly with plastic wrap.)
3. Preheat oven to 350 degrees. Unwrap logs; with a serrated knife, slice dough 3/8 inch
thick (if dough crumbles, leave at room temperature 5 to 10 minutes). Arrange slices,
about 1 inch apart, on baking sheets.
4. Bake until lightly golden around the edges, 15 to 20 minutes. Cool on baking sheets 1 to
2 minutes; transfer to a wire rack to cool completely.
This recipe makes two logs of dough. The logs can be refrigerated for up to four days or frozen for up to three months (thaw before slicing and baking). To make two flavors with one recipe, divide the dough in half in step 1 before adding mix-ins (and use half the amounts given).
CANDIED MEYER LEMON PEEL
4 meyer lemons
1 cup sugar
1 cup water
1. Place sugar and water in a small pot and simmer, stirring occasionally until mixture simmers and all the sugar dissolves.
2. While sugar is cooking, use a peeler or pairing knife, slice the skin from the lemons cutting off as little of the white pith as possible. Lay each slice of lemon on a cutting board use a thin pairing knife to slice off any white pith attached to the skin.
3. Slice the lemon peel into desired size. Place in the simmering sugar syrup and simmer on low until peels are translucent. Peel can be removed from the syrup, cooled and then added to cookie batter or other dish. Peel can be stored in the sugar syrup, and lemon sugar syrup can be used to make drinks or other treats.

Chocolate Brownie Cookies
From The Last Course by Claudia Fleming of Gramercy Tavern
These cookies are rich, fudgy and have that perfect shine and crackle you'll find on top of a great pan of brownies.
1/4 C All purpose flour
1/4 teaspoon baking powder
1/8 teaspoon salt
2 large eggs
2/3 C sugar
1/2 TB brewed espresso
1 teaspoon vanilla extract
2 Tablespoons unsalted butter
5 oz. best quality 70% extra-bittersweet chocolate
2 oz. unsweetened chocolate
3/4 C. mini semisweet chocolate chips or chopped regular sized chips.
1. Preheat oven to 375. Line 2 cookie sheets with parchment.
2. Whisk flour, baking powder and salt together in a small bowl
3. In an electric beater bowl fitted with a whisk attachment whip eggs until foamy. Add
vanilla, espresso and sugar and beat on high speed until thick for about 15 minutes.
4. While eggs are beating, melt bittersweet and unsweetened chocolate with the butter in a
double boiler, microwave or in a bowl over a pan of water.
5. Gently fold melted chocolate into thickened egg mixture. Mixture should still be streaky.
Fold in flour. Fold in chocolate chips.
6. Drop by heaping teaspoonfuls (or use a truffle scoop) onto prepared baking sheets leaving an inch or two between cookies. They don’t spread too much.
7. Bake for 8 or 9 minutes until puffed and slightly cracked. Cool on a wire rack before
removing them from baking sheet.
SUGAR COOKIE PINWHEELS AND STRIPES
From Martha Stewart
Ingredients:
1 1/2 cups (3 sticks) butter
1 3/4 cups sugar
1 teaspoon salt
2 eggs, plus an extra egg white for "glue"
3 teaspoons pure vanilla extract
5 cups flour, plus more for work surface
2/3 cup milk
1/4 cup cocoa powder
Food coloring, in various colors
1. Using the electric mixer, mix the butter and the sugar until creamy. Add the eggs and the salt, and mix well. Beat in milk and vanilla. Add flour a little at a time, mixing it in until all of it has been incorporated.
2. Divide the dough into balls, one for each color. For chocolate dough, add cocoa (1/4 cup is enough to flavor half a batch). Mix well with electric mixer. For colored dough, start with 1/4 teaspoon food coloring, and mix well. Add more in tiny amounts for darker colors. Gel paste coloring can be intense, so add it gradually.
3. Wrap each ball of dough in its own sheet of plastic wrap; pat flat into a rectangle. Refrigerate at least one hour or until ready to use.
4. Parchment or waxed paper makes a good work surface. Sprinkle generously with flour, then roll out each piece of dough 1/4 to 1/2 inch thick to make the swirls; you can use thicker layers for the bulls-eyes.
5. The bench scraper is a good tool for trimming dough's edges to make them even. The egg white, brushed on with a pastry brush, will act as a glue, making the layers stick together.
6. For center: with your hands, roll chocolate dough into a 1/2- to 1 1/2- inch-thick rod; chill 20 minutes. Place rod on edge of rolled-out dough that's been brushed with egg white. Roll rod inside sheet of dough. Cut the dough where it meets up. Seal by pinching and pressing gently. Chill 20 minutes, then repeat to add other layers. To decorate, go to step 7, or jump to step 8 for plain. For spirals: measure and trim two or more colors of dough to same size. Brush on egg white, then stack layers. Brush top with egg white. Starting at one end, roll up the dough.
7. Smooth and straighten the layers as you roll them so there are no gaps, then gently pinch and press the edge of the roll to seal it. Now the dough is ready to decorate. If you want plain cookies, skip to step 18.
8. Add your favorite toppings (try coconut, colored sanding sugar, chopped nuts, or chocolate sprinkles): Spread topping in baking sheet, brush dough with egg white, and roll the log in topping.
9. Roll each log in parchment or waxed paper; twist the ends of the paper closed. To help the logs keep their round shape, set each in a cardboard paper-towel roll that you have sliced open lengthwise.
10. To remember what colors you have already used, with crayons, draw the designs onto key tags; tie the tags onto the paper covering the logs. Chill logs until they are solid, about 1 1/2 hours.
11. Cut 15 inches of dental floss (or double thickness of thread). Let log soften for about 10
minutes. Remove parchment. Wrap floss around log and pull through. Make the slices thin: 1/4 inch or less.
12. Preheat oven to 350 degrees. Place slices on an un-greased baking sheet (lined with
parchment paper). A grown-up should bake the cookies 12 to 15 minutes, until firm but not
browned. Let cool on baking sheet for several minutes, then transfer to a wire rack.

Raw Cocoa Walnut Truffles
Delicious, easy and raw, gluten free, and refined sugar free!
1 1/2 cups Medjool dates
2 cups Walnuts
1/2 cup unsweetened cocoa (raw cocoa or regular cocoa)
1 teaspoon vanilla
pinch salt
Options for coating (pick one or a few):
1/3 cup cocoa for rolling truffles
1/3 cup cinnamon
1/3 cup shredded coconut (raw or toasted)
1/3 cup finely chopped nuts
Some ideas for flavoring:
Cinnamon, clove, ancho chili pepper
Cardamom, orange zest
Peppermint oil
Candied ginger
1. Remove pits from dates. Put dates in a bowl and cover with warm water for 5 minutes.
2. Chop nuts in a food processor until fine (coarse if you like). Place in a bowl.
3. Remove dates from bowl and reserve water. Place dates in the food processor with
cocoa, vanilla and a pinch of salt. Pulse until mixture is smooth. Add a spoonful or two of
reserved date water if the mixture is too thick to blend. Add walnuts and pulse once or
twice to incorporate. Add any flavor options you like.
4. Using a teaspoon or very small ice cream scoop, portion the mixture into small scoops on
a piece of waxed paper. Roll the balls between your hands gently to form a smooth ball.
Quickly toss each ball in the cocoa (or other coating). Place truffles in tiny muffin papers if
desired. Store in an air tight container. Will keep for 2 weeks at room temperature.

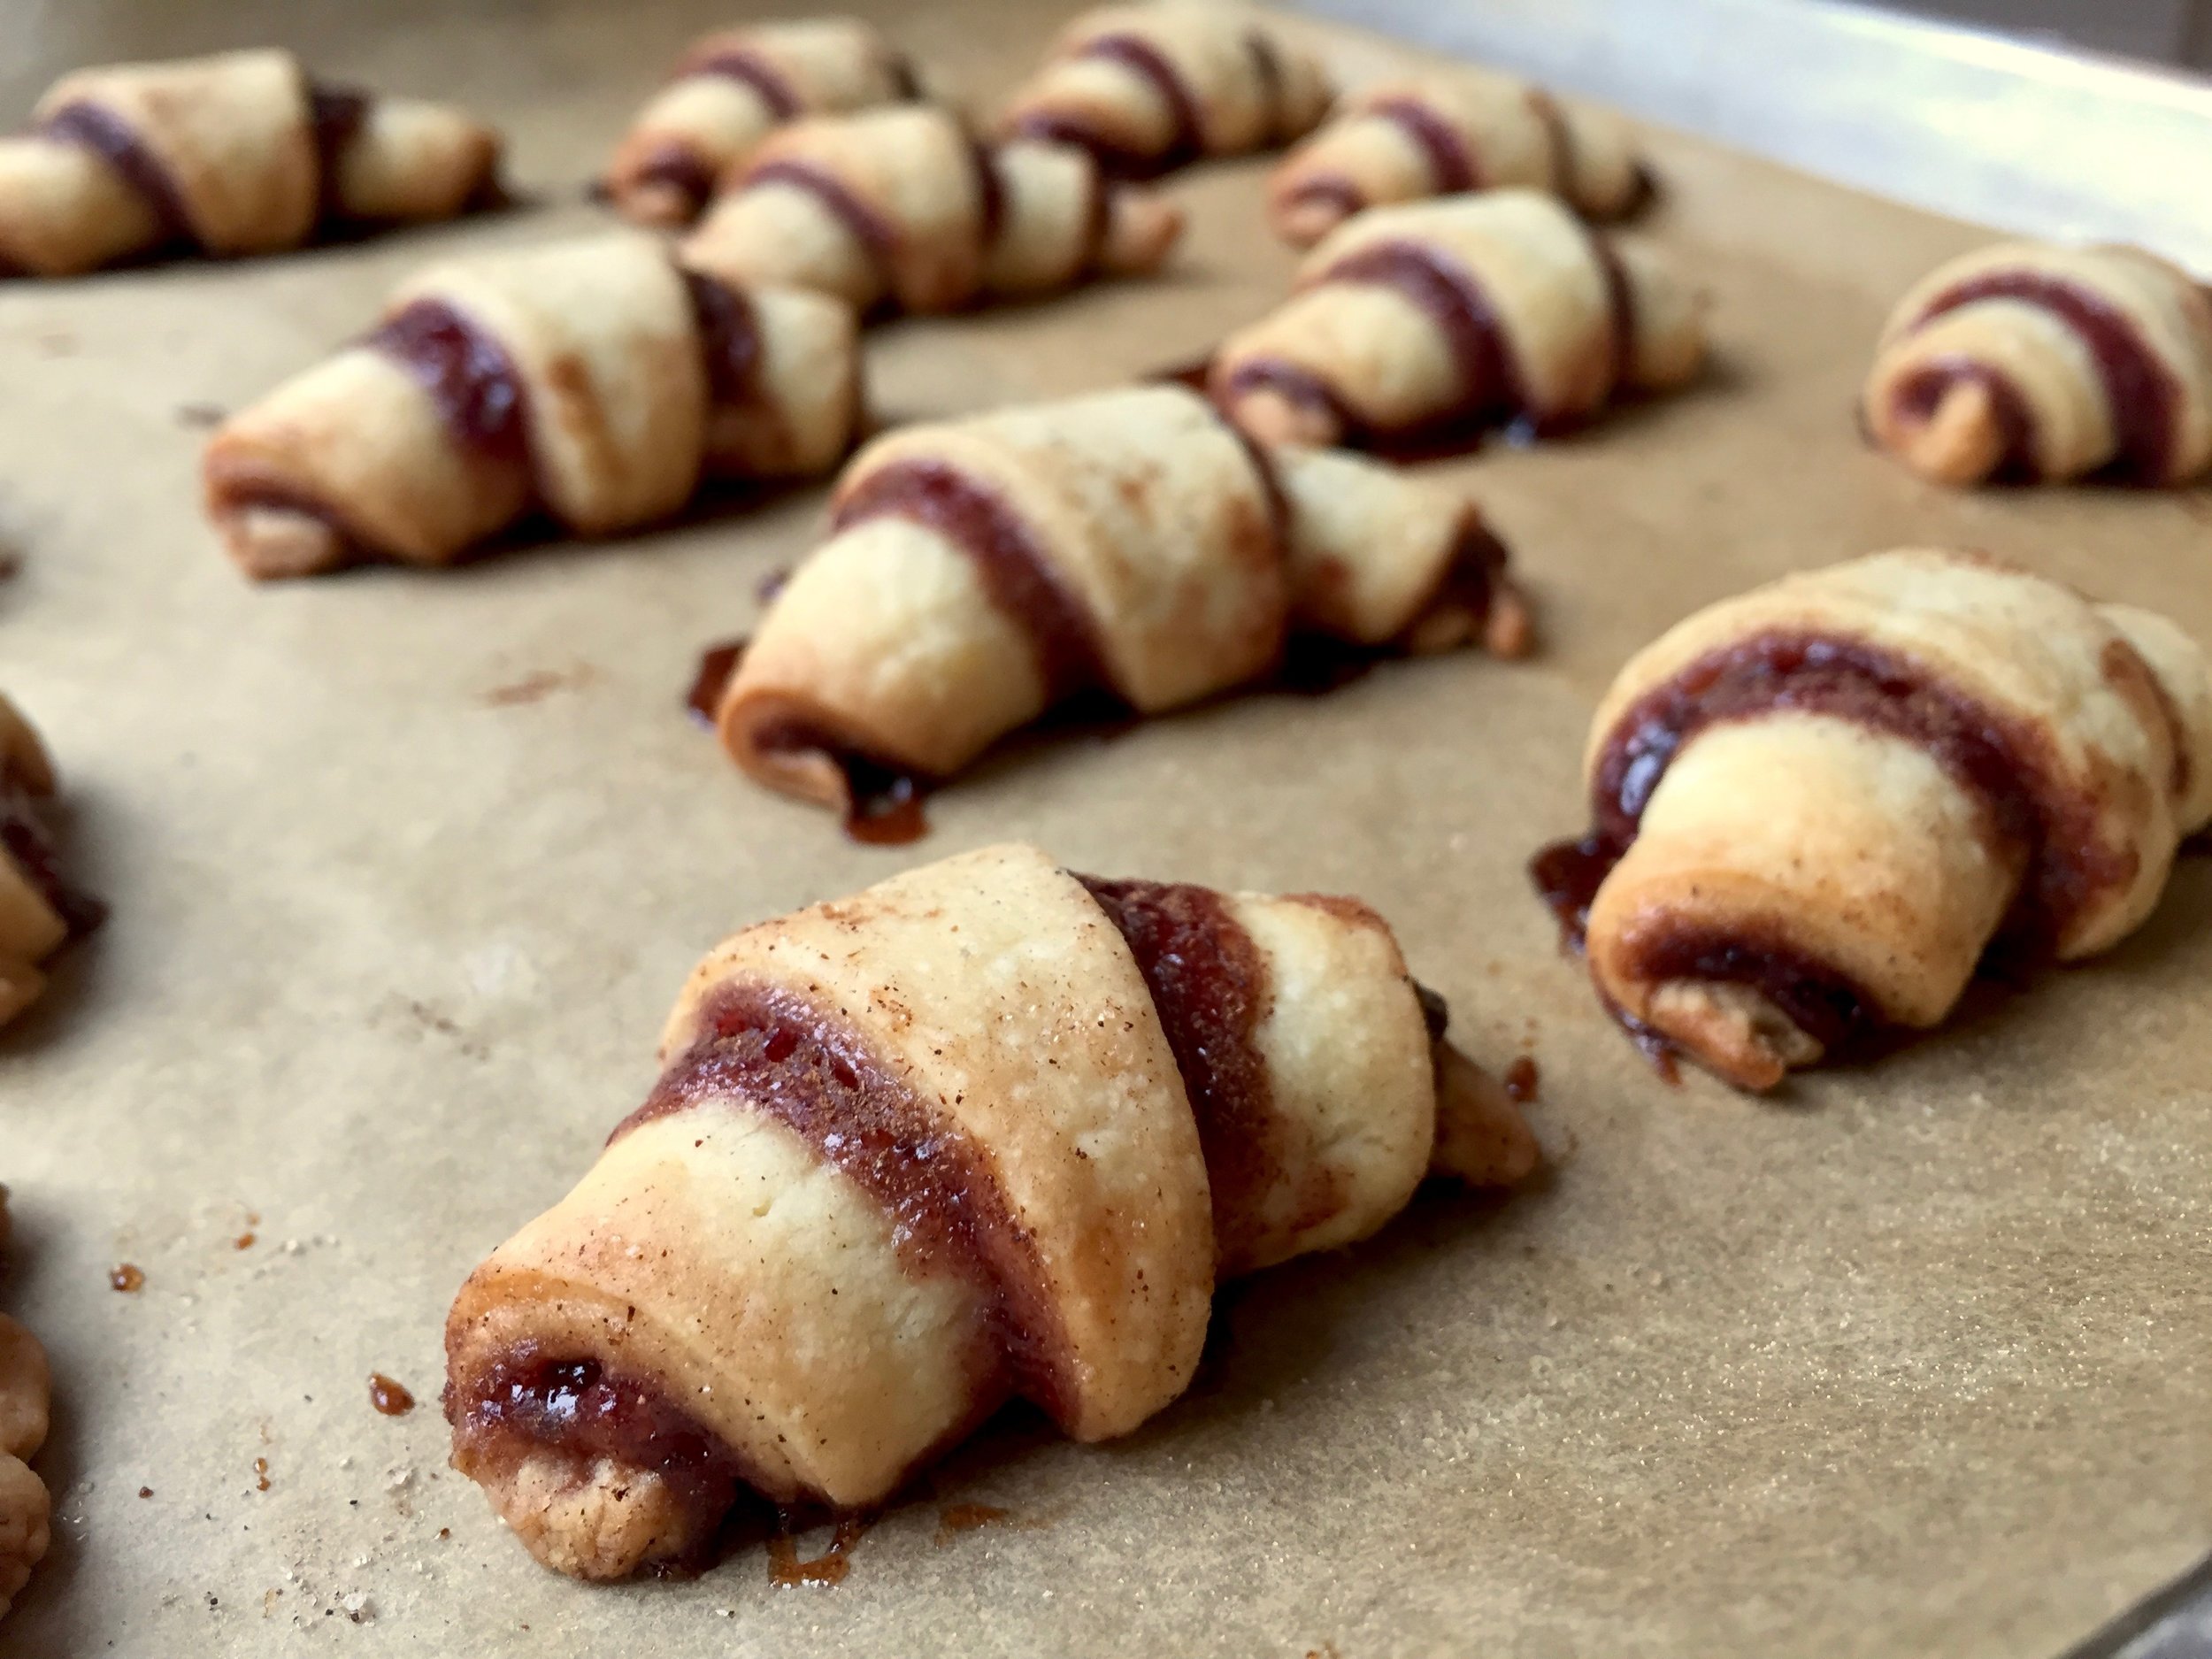
Rugelach
adapted from Margaret Palca Bakes
makes 80 cookies
14 tablespoons butter
8 ounces cream cheese
2 cups flour
1/2 cup powdered sugar
1 cup Jam or jelly of your choice (apricot or raspberry are the classics)
1 1/2 cups walnuts or pecans finely chopped
2 tablespoons sugar
1 teaspoon cinnamon (optional)
1. Line 3 baking pans with parchment paper or butter very well. Cream butter and cream
cheese till very fluffy, add sugar and flour until well combined.
2. Split into 5 rounds*, wrap in plastic wrap and chill for at least 1 hour, or overnight. Lightly
flour one dough round at a time and Roll out between two sheets of wax paper, about 10
or 12 inches in diameter.
3. Mix nuts, cinnamon and sugar together. Blend jam in a food processor or melt and cool it
to make it easy to brush onto the soft dough.
4. Working with one round at a time, brush with a thin layer of jam, and sprinkle with
crushed nuts mixture. Cut round into 16 wedges (like a tiny pizza), roll them up from the
outside edge inwards and place on baking sheet.
5. Bake at 350 till very golden. I didn’t time these, but I think about 18 minutes or so... Rugelach must cool completely to come off of parchment paper.

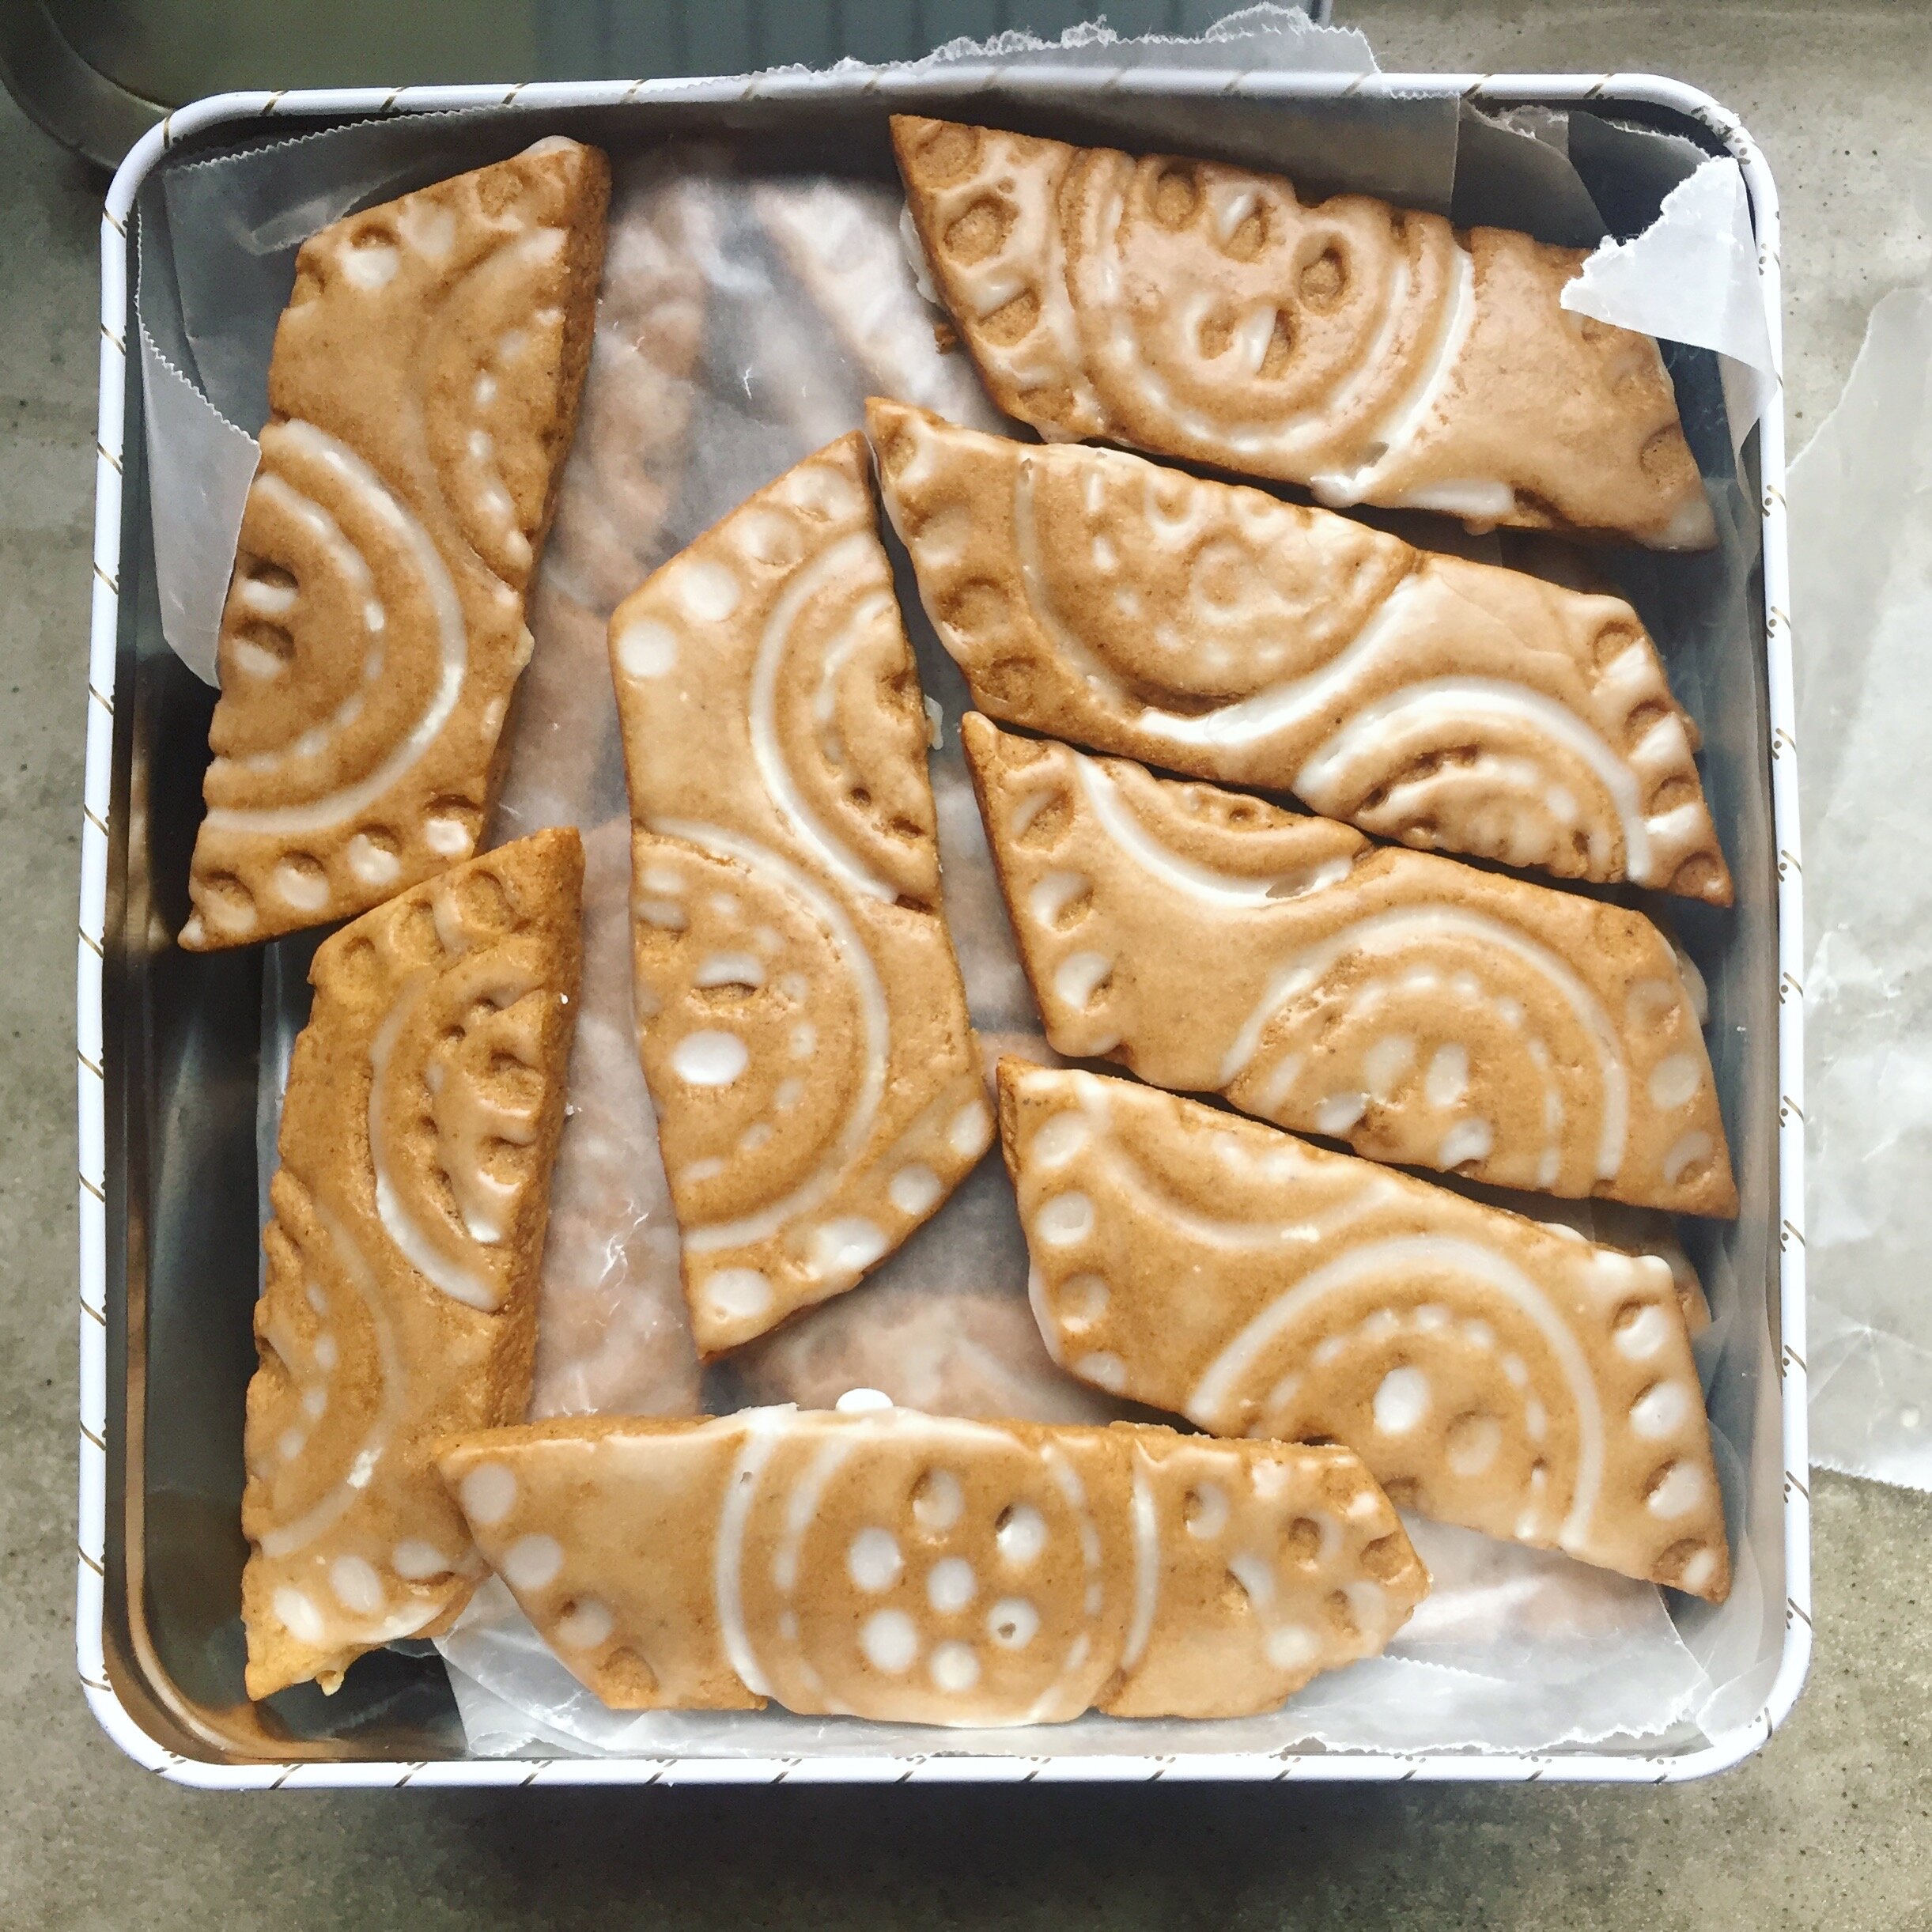
Soft Glazed Gingerbread
From Tartine
Makes 12 to 20 cookies depending on size of cutters
Dough
3¾ cups all-purpose flour
1 tbsp. cocoa powder
4 tsp. ground ginger
1½ tsp. ground cloves
2 tsp. ground cinnamon
½ tsp. baking soda
1 tsp. salt
1¼ tsp. black pepper, freshly ground
1 cup (8 ounces) unsalted butter, at
room temperature
¾ cup + 2 tbsp. granulated sugar
1 large egg
½ cup blackstrap or other dark molasses
2 tbsp. light corn syrup
Glaze
1 cup confectioners’ sugar
2 tbsp. water
To make the dough:
1. Stir together the flour, cocoa powder, ginger, cloves, cinnamon, baking soda, salt, and
pepper in a mixing bowl. Set aside.
2. Using a stand mixer fitted with the paddle attachment, beat the butter on medium-high
speed until creamy. Slowly add the granulated sugar and mix on medium speed until the
mixture is completely smooth and soft. Stop the mixer and scrape down the sides of the
bowl with a rubber spatula as needed. Add the egg and mix well. Add the molasses and
corn syrup and beat until incorporated. Stop the mixer again and scrape down the sides of
the bowl.
3. Add the flour mixture and beat on low speed until a dough forms that pulls away from the sides of the bowl and all the ingredients are well incorporated. Remove the dough from the bowl, flatten it on a large piece of plastic wrap into a rectangle about 1 inch thick, cover the dough with the plastic wrap, and refrigerate overnight.
To Shape:
Preheat the oven to 350ºF. Line a baking sheet with parchment paper or a nonstick liner.
Unwrap the dough and place on a floured work surface. If using a plaque with a design, roll
our the dough 1/2-inch thick, lightly dust the op with flour, press your cookie molds over the dough, and then cut out the shapes with a small knife and place on the prepared baking sheet, spacing them about 1 inch apart. Alternatively, using the mold as a guide, cut around it with a small knife, flip the mold over so the design is facing you, and place the dough over it, pressing it into the design. Un-mold the shapes onto the prepared baking sheet, leaving about 1 inch between them. Note: the cookies above were printed using lego parts to create a repeating pattern (pic below).

If using a patterned rolling pin, lightly dust the lined baking sheet with flour and transfer
the dough to the pan. Lightly dust the top of the dough with flour and roll it into a rectangle about 1/3 inch thick with a plain pin. Then, using the patterned pin, roll over the dough with enough pressure to ensure a clear impression of the design. Trim the sides with a small knife. It is not necessary to cut into smaller sizes before baking.
Bake the cookies until lightly golden along the sides but still soft to the touch in the centers,
7 to 15 minutes. The timing will depend on the size of the individual cookies, or if you have
made a single large patterned piece that will be cut after baking.
While the cookies are baking, prepare the glaze. In a small bowl, whisk together the
confectioners’ sugar and water until smooth.
When the cookies are ready, remove from the oven and let cool on the pan on a wire rack
for about 10 minutes. Then, while the cookies are still warm, using even strokes, brush a
light coat of glaze on the top of each cookie, evenly coating it. Let the cookies cool
completely. When the glaze dries, it should leave a shiny opaque finish. If you have a used
a patterned rolling pin to make a single large plaque, cut into the desired shapes with a
small very sharp knife. The cookies will keep in an airtight container in a cool place for
about 2 weeks.

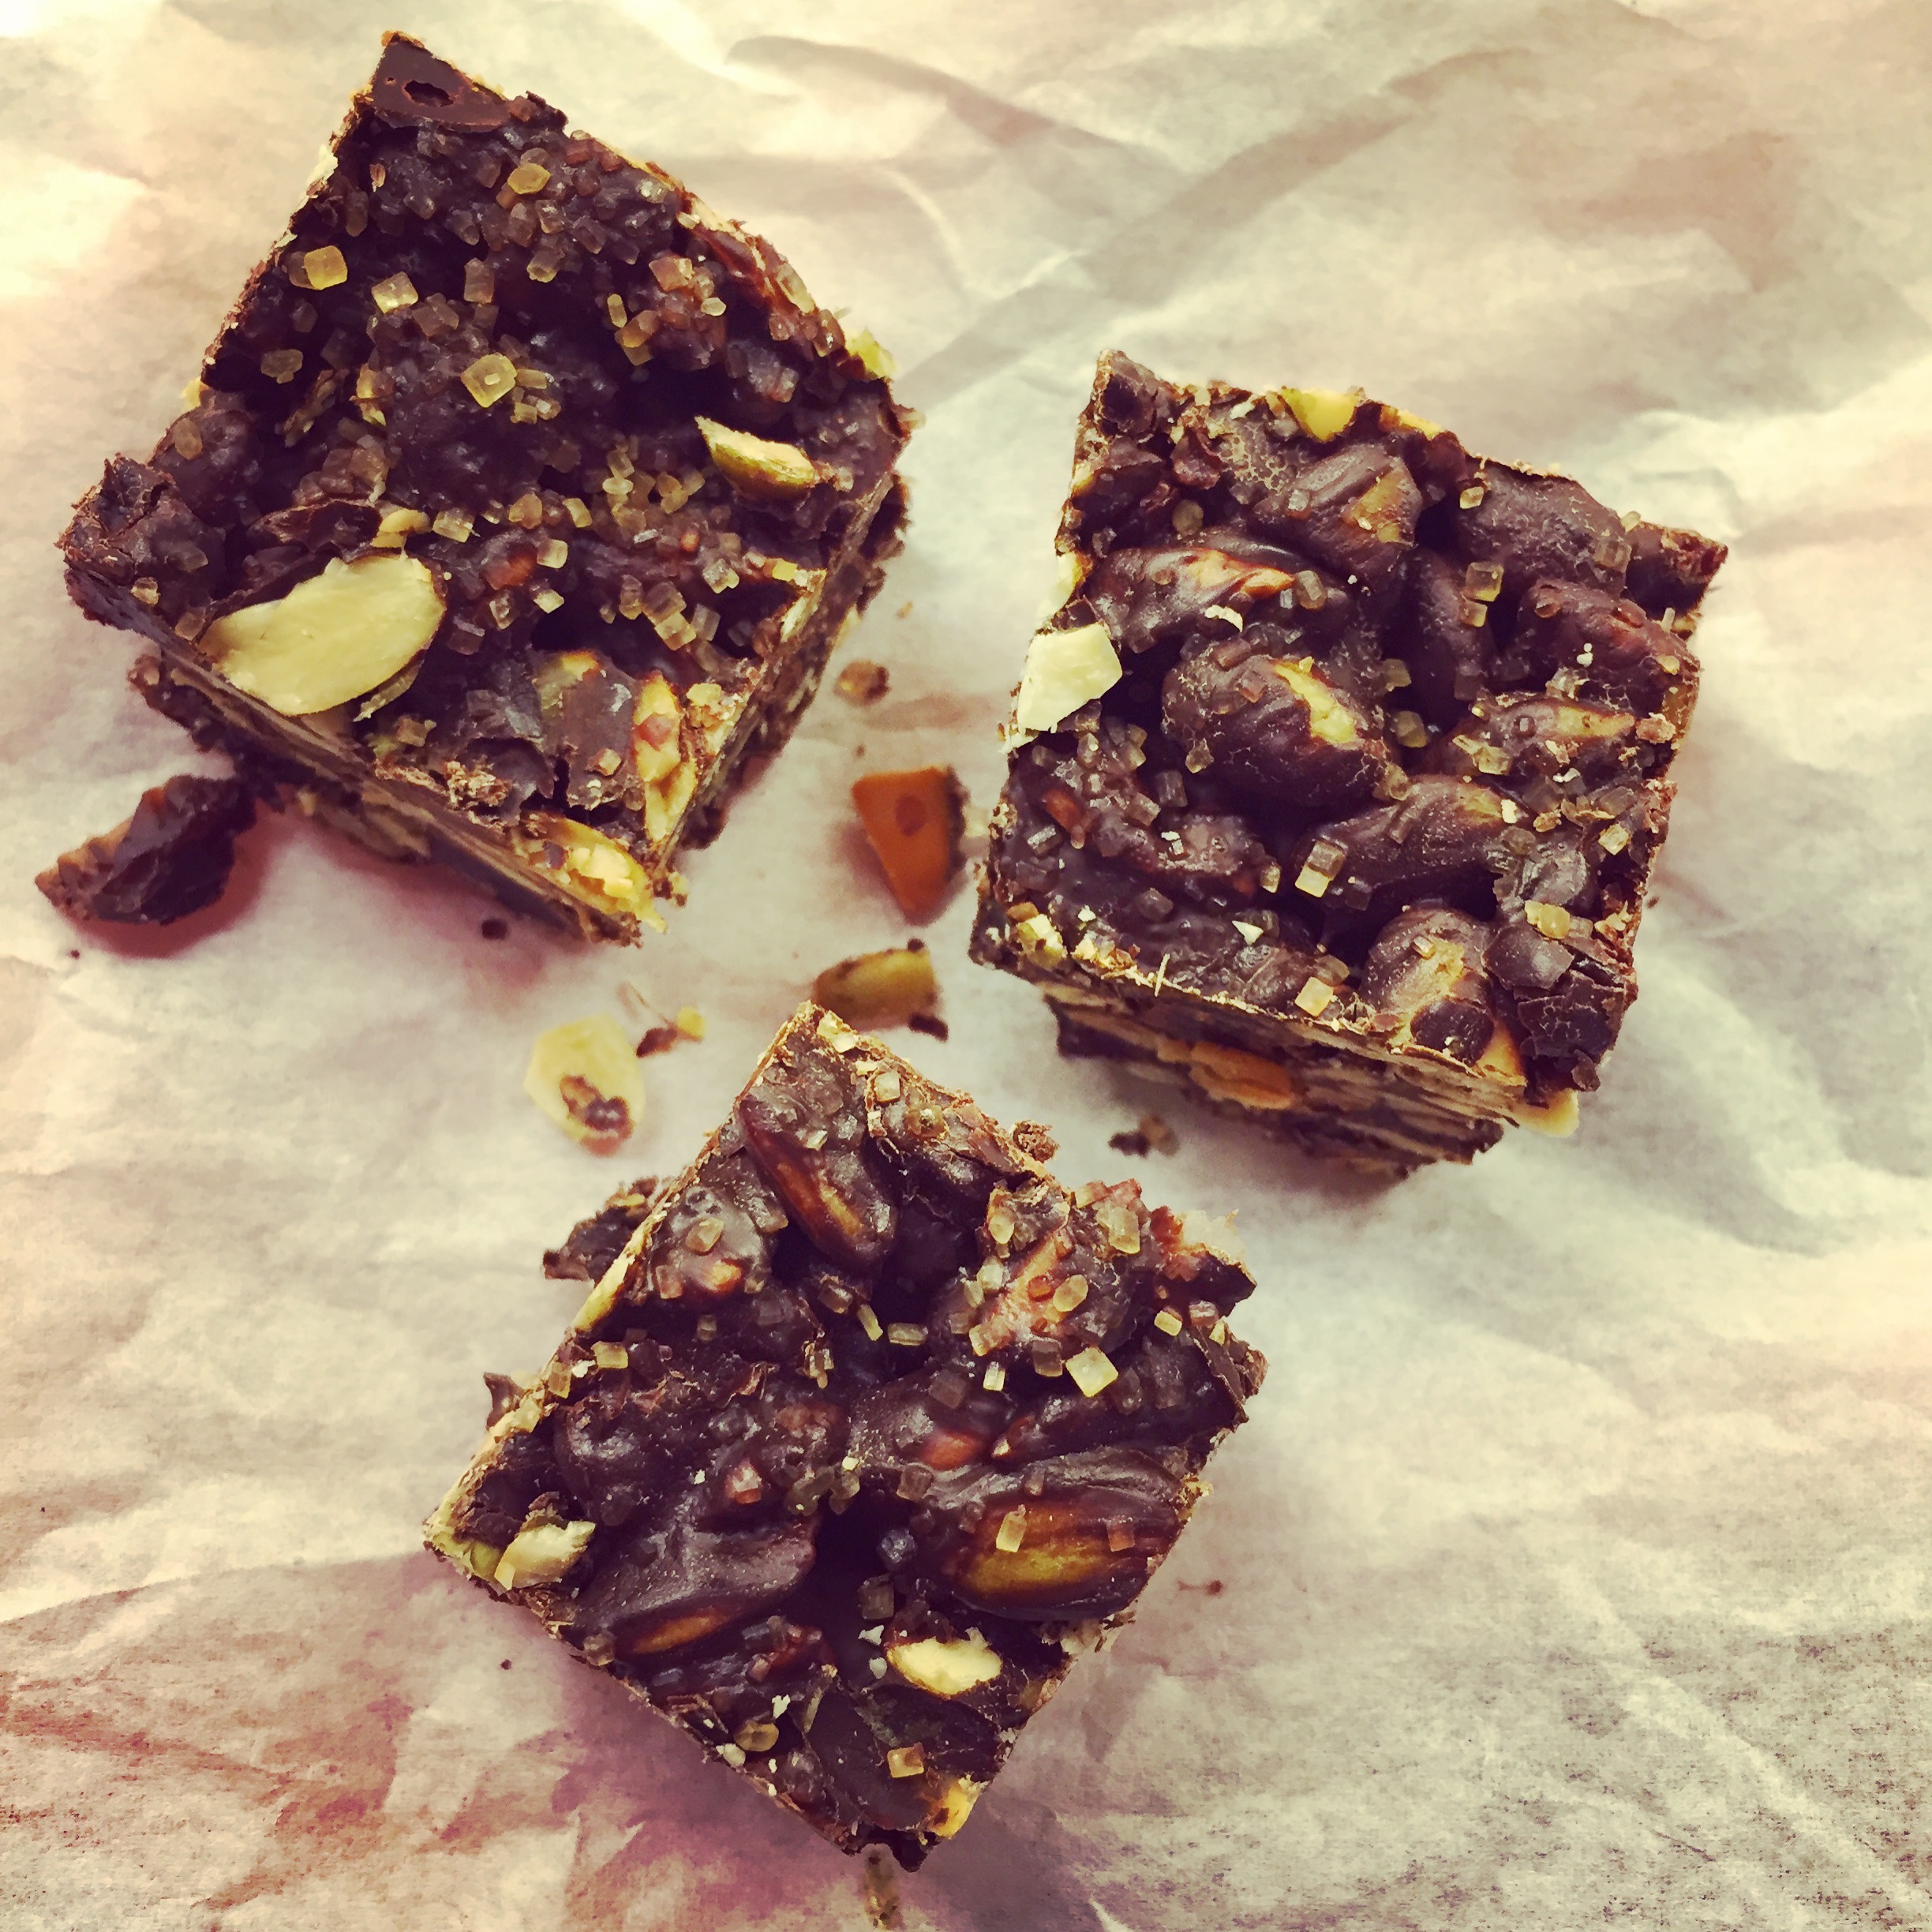
Chocolate Clusters, Ginger, Cherry & Pumpkin Seed
These are my attempt at something a little healthier but still decadent. These are just nuts, seeds, and dried fruit covered in 70% dark chocolate and sprinkled with coarse raw sugar.
No measured recipe here, just pick an assortment of nuts, seeds and dried fruit, melt some chocolate, mix everything together, spread on a parchment lined pan, sprinkle with raw sugar, cool, and cut.
My favorite combination: Candied ginger (finely chopped) dried unsweetened tart cherries, pumpkin seeds, and hazelnuts. Unsweetened shredded coconut and sunflower seeds make excellent and affordable additions or substitutions.

